序章
信じられないかもしれませんが、CD のリッピングは芸術であり、限られたストレージに 128kbps MP3 ファイルを詰め込んでいた黄金時代から大きく変わりました。目標はもはや「小さくて十分」ではありません。可能な限り絶対的に最高品質のコピーを入手することです。
多くのオーディオCD リッピング(新しいタブで開きます)パッケージは、ジッターをわずかに補正します。これにより、トラックを読み取る際の傷やほこりの影響が軽減されますが、これらのトラックを注意深く耳を傾けて聞く必要があります。修正するとトラックに不完全さが残る可能性があります。
Exact Audio Copy (新しいタブで開きます)、私たちが選んだ最高の CD リッパーは、少し異なる方法で動作します。ジッター補正を実行し、リッピングしたオーディオを元のトラックと比較して整合性をチェックし、複数の読み取りを実行して正確な複製を保証します。これは素晴らしいものですが、EAC を最大限に活用するには、少しセットアップが必要になる場合があります。
合法性
法律について簡単に説明します。リッピングは、世界のどこにいるかによって、法的立場に疑問のある行為です。米国では、ある形式のメディア (つまり CD) から別の形式のメディア (つまり MP3 プレーヤー) に曲をスペースシフトすることが許可されているかどうかを示す法的先例はありません。
オーストラリアでは、大丈夫です。法律では、配布しない限り、所有するメディアのコピーを作成する権利があると定められています。
ヨーロッパでは、法律は州ごとに多少異なりますが、主な政府は、国民が私的使用のためにメディアを複製することを法的に許可した場合、権利所有者に認識された損失を直接補償します。
英国では、短期間の明確な合法性にもかかわらず、高等裁判所は CD のリッピングを違法とした。だからやめてください。
1. 正確なオーディオコピーを取得する
いつものように、簡単なところから始めましょう。www.exactaudiocopy.de (新しいタブで開きます)にアクセスし、左側の [ダウンロード] リンクを使用して EAC ダウンロードを見つけます。そうでない場合は、適切なフラグをクリックしてください。ドイツ語版をダウンロードしたくないのですが。
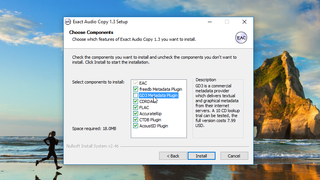
インストーラーを起動し、個々のコンポーネントを選択するオプションが表示されるまでクリックし、その後 GD3 の選択を解除します。これはまともなサービスですが、メタデータにアクセスするために 8 ドルの価値がある CD リッピング エクスプロイトを利用している人にはまだ出会っていません。完了したら、「インストール」をクリックします。

2. ウィザードを実行します
Exact Audio Copy を初めて開くと、クイック構成ウィザードを実行する必要があります。複数の光学式ドライブがある場合は、ディスク リッピングに使用する光学式ドライブを選択できます (すべてではない場合)。EAC は自動的に適切に構成します。
Obviously, you’ll want to make sure ‘accurate results’ is selected rather than the speedier option. When EAC asks you to insert a disc to check your drive’s accuracy, you’ll probably jump to the next step...
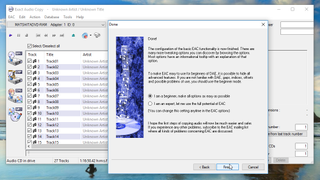
3. Configure AccurateRip
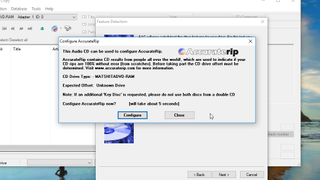
If all has gone to plan, you’ll see a dialog leap on top of the wizard that asks if you want AccurateRip to run through its configuration process – this is the comparison engine that ensures your rips are the same as those from others worldwide. Click ‘Configure’.
It’s likely that AccurateRip will now ask for further discs to verify that the information it’s worked out about your drive’s laser offset is correct. Grab a few more discs and insert them as instructed, and try not to get infuriated if AccurateRip rejects them.
4. Back to the wizard
With AccurateRip happy, leave a disc in the drive and allow the wizard to continue. It’ll run through your disc, checking your optical drive’s features as it does so, to determine the drive’s suitability for accurate ripping. If our experience is anything to go by, it may also appear to crash, but give it a couple of minutes and the test should complete without a hitch. Ideally you’re looking for accurate ripping to be a ‘yes’ and caching to be a ‘no’ on the results screen.
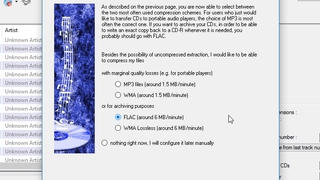
Move on a few pages and you’re offered your choice of ripping formats: we’d recommend FLAC as opposed to any others, and you’ll still be able to write raw uncompressed WAV files if you choose.
5. More wizarding
Further on, you’ll be asked for an email address to use metadata provider freedb; this doesn’t have to be a real address, and you don’t need to register, so insert something here if you want your tracks automatically labeled from that source – there are also several others, like CueTools DB, that can provide the relevant details.
Next you can select your track naming scheme from a long list. Choose what looks right to you. Finally, the big one: are you a beginner, or are you an expert? Leave EAC on beginner mode for now – if you get serious about your rips, you can switch on the full raft of features later on.
6. More options
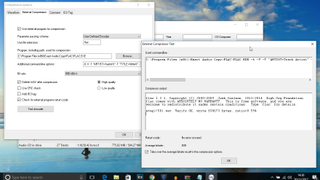
Head to EAC > Compression Options and open the External Compressor tab. FLAC should be selected and, all being well, set up by default. Click the 'Test Encoder' button to check that all is working; this will also set the Bitrate box appropriately. Note that this makes no difference to the eventual rip – it’s a logical value used during the ripping process.
Now, select everything in the ‘Additional command-line options’ box and paste the following parameters as-is:
-8 -V -T "ARTIST=%artist%" -T "TITLE=%title%" -T "ALBUM=%albumtitle%" -T "DATE=%year%" -T "TRACKNUMBER=%tracknr%" -T "GENRE=%genre%" -T "PERFORMER=%albuminterpret%" -T "COMPOSER=%composer%" %haslyrics%–tag-from-file=LYRICS="%lyricsfile%"%haslyrics% -T "ALBUMARTIST=%albumartist%" -T "DISCNUMBER=%cdnumber%" -T "TOTALDISCS=%totalcds%" -T "TOTALTRACKS=%numtracks%" -T "COMMENT=%comment%" %source% -o %dest%
This should ensure that your ripped tracks are done so with the maximum of available information. Click OK when you’re done.
7. Time to rip
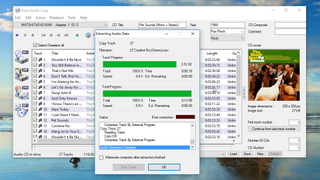
Let’s turn a disc into some FLAC files. On the main interface, click the blue CD icon with the red plus on the top bar to pull in data about your disc – all being well, it’ll find the album name, cover art and the like, though if the disc has been released several times you’ll want to pick the correct version for accuracy.
With that all set, click the button labeled ‘CMP’ on the left hand side of the main interface to make a compressed rip, in FLAC format. Don’t be concerned about the status window mentioning .wav files at the top – files are automatically ripped in WAV format, converted to FLAC, and then the original files are deleted from your machine.
8. Check the results
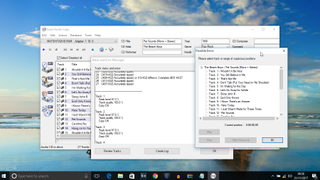
リッピングが完了すると、最初に AccurateRip からレポートが表示され (構成するのに十分なディスクが見つかった場合)、次にトラックの選択ではなくディスク全体をリッピングした場合は、キューツール DB。どちらも(できれば)リッピングの完璧な結果を確認します。
何か不審な点が見つかった場合は、[トラックの確認] ボタンを使用して、EAC が完全に満足していないオーディオの部分を聞いて、必要に応じて再リッピングすることができます。
9. これはやめてください
最初のディスクをリッピングしたら、希望どおりの結果を正確に得るためにいくつかのオプションを調整します。興味深い設定の大部分は、[EAC] > [EAC オプション] にあります。[抽出] タブをチェックして、無音部分のブロックを自動的に削除したり (100% 正確ではありませんが、高解像度のポータブル プレーヤーを使用している場合はより便利になる可能性があります)、ドライブを自動的に冷却して最高のパフォーマンスで動作し続けることができます。
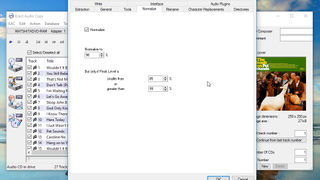
「正規化」タブでは、オーディオのレベルをまとめて、静かな部分をより大きく、大きな部分をより静かにすることもできます。でもやめてください。正規化はスポークン ワード ディスクには問題ありませんが、音楽トラックに対して行うことのできる最悪の行為です。