
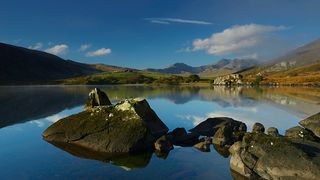
天気のことになると、いつも文句を言いたくなるものです。雨が降っていたら晴れてほしいと思いますし、晴れたら暑すぎると嘆きます。外の天気を変えることはできないかもしれませんが、これらの愚痴は素晴らしい Photoshop プロジェクトのインスピレーションとなる可能性があります。
このチュートリアルでは、暖かく晴れた風景を、ムーディーで霧のかかった風景に変える方法を説明します。まず、トーンをクールダウンし、色の彩度を選択的に調整して、夏の色合いを涼しいカラーパレットに置き換える必要があります。
これには、画像のトーンを究極的に制御できる調整レイヤーを組み合わせて行うのが最適です。
いくつかのフィルターやエフェクトを適用するのではなく、徐々にミストを蓄積していきます
画像が適切にトーン化されたら、ミストを追加します。いくつかのフィルターやエフェクトを適用するのではなく、レイヤーやマスクを使用してミストを徐々に築き上げ、深みを与えます。
重要なのは、霧をランダムに見せ、シーンの遠近感に合わせて形を整えることです。レイヤーをごちゃ混ぜの雲で埋める雲フィルターでランダム性を実現し、スクリーン ブレンディング モードを使用して効果を画像と簡単にブレンドできます。
本物の霧は、水線に沿って遠くに遠ざかっていくにつれて、自然に濃く見えます。Transform コマンドを使用して、デジタル ミストを同様の視点に従うようにすることができます。
また、ブラシ ツールとスマッジ ツールを使用して、水から上に上がる微妙な渦巻きをいくつか作成します。
ステップバイステップ: Photoshop で霧を作成する方法
1.コントラストを調整する
Photoshop で画像を開き、[ウィンドウ] > [ウィンドウ] に移動します。レイヤー。「調整レイヤーの作成」をクリックし、「カーブ」を選択します。対角線のカーブ ラインの中腹をクリックしてアンカー ポイントを配置し、2 番目のポイントを左下半分にドラッグして逆 S 字形を作成します。
2. ブルースを下げる
「調整レイヤーの作成」をクリックし、「カラーバランス」を選択します。デフォルトでは、設定はミッドトーンに影響しますが、ハイライトとシャドウの色をシフトすることができます。ドロップダウン メニューに移動して [ハイライト] を選択し、黄色/青色のスライダーをドラッグして -65 に戻します。
3. 彩度を下げる
Add a Hue/Saturation Adjustment Layer. Target and adjust different colors by selecting them from the Master drop-down, or click on the Hand and drag left or right over colors. Select Greens and set Saturation to -80, then Cyans and set Saturation to -80.
4. Add some grey
Add a second Hue/Saturation Adjustment Layer, setting Master Saturation to -31. Click the Master drop-down and select Blues. Set Saturation to -73 and Lightness to +35. Choose Greens and set Saturation to -64, then choose Yellows and set Saturation to -59.
5. Remove the clouds
Click on the Background Layer, then go to Layer > Duplicate Layer to copy it. Grab the Spot Healing Brush, then zoom in closer to the clouds. Ensure Sample All Layers is unchecked, then use the Spot Healing Brush to paint over and remove the clouds.
6. Clone to tidy
If the Spot Healing Brush tool has left some rough patches, grab the Clone tool and set Opacity to 20%. Hold Alt and click to sample from a clean area of sky, then clone over the patches to blend tones. Set the Opacity of the layer to 74% for a hint of original clouds.
7. Whiten the sky
Create a layer called Gradient. Grab the Gradient tool and choose the Linear Gradient Style. Click on the Gradient Picker and select Foreground to Transparent. Hit D then X to set the color to white. Hold Shift and drag a line as above. Set Opacity to 43%.
8. Darken the hills
Hold Alt and click Create New Layer. In the New Layer box choose Mode: Overlay, then check 'Fill with Overlay-neutral color'. Hit OK. Grab the Burn tool and set Range to Midtones and Exposure to 20%. Paint with the tool to burn (darken) the land on the right.
9. Apply a Clouds filter
Highlight the top layer, then click Create New Layer and name the layer Mist. Hit D to reset the colors, then go to Filter > Render Clouds to fill the layer with random clouds. Click the Blending Mode drop-down and choose Screen, so only the lighter tones appear.
10. Add a graduated mask
Go to Filter > Convert for Smart Filters, then to Filter > Blur > Gaussian Blur. Set Radius to 45px and hit OK. Click on the Smart Filter mask thumbnail, then grab the Gradient tool. Hit D then X to set color to black. Hold Shift and drag a line from bottom to top.
11. Mimic the perspective
Click on the top layer, then go to Edit > Transform > Distort. Hit Cmd/Ctrl and the - key a few times to zoom out, then drag the bottom right and left corners outwards and the top right and left corners downwards until they meet the skyline. Hit Enter to apply.
12. Paint a mask
Hold Alt and click Add Layer Mask to add a full mask that hides the clouds. Grab the Brush tool, choose a soft-edged circular brush tip and set the brush opacity to 20%. Set the foreground color to white, then paint over the water to reveal the mist.
13. Copy and transform
Hit Cmd/Ctrl + J to make a duplicate layer, then right-click the Layer Mask (not the Smart Filter mask) and choose Delete Layer Mask. Hit Cmd/Ctrl + T, then drag the bottom middle points upwards. Hit Enter, then click Add Layer Mask to add a new empty mask.
14. Mask the mist
Grab the Gradient tool, go to the options at the top and choose Reflected Gradient. Select Foreground to Background and hit D to set the color to white. Drag a short line down from the water line so only a thin strip is visible. Set the layer Opacity to 75%.
15. Make another copy
Hit Cmd/Ctrl + J. Delete the Layer Mask and transform it to make it thinner. Add a reflected gradient on a Layer Mask to make a smaller strip. Set Opacity to 45%. On a new Swirls layer, grab the Brush tool set to white with an Opacity of 20% and Flow of 35%.
16. Paint random mist
In the Brush Preset Picker, select Spatter 14 (if you can't see it, go to Reset Brushes). Go to Window > Brush > Brush Tip Shape. Set Size to 300px and Spacing to 50%. Click Shape Dynamics and set Angle Jitter to 100%. Paint to add mist on the water line.
17. Use the Smudge tool
スマッジツールをつかみ、オプションバーに移動して強度を 50% に設定します。[フィンガー ペイント] と [すべてのレイヤーをサンプル] の両方がオフになっていることを確認し、ツールを使用して白いブラシ ストロークを湖から立ち上る霧の渦に塗り込みます。
18. 最終的な色調の調整
一番上のレイヤーが強調表示されていることを確認し、カーブ調整レイヤーを追加します。1 つの点を上にドラッグし、2 つ目の点を下にドラッグして浅い S 字カーブを作成し、コントラストをわずかに高めます。その他の色調の調整は、さらに調整レイヤーで行います。

Adobe Creative Cloud に参加すると、初年度は 15% 割引になります(新しいタブで開きます)
TechRadar は Adobe と提携して、Creative Cloud All Apps メンバーシップに特別割引を提供します。最初の 1 年間は、月額 $52.99/£49.94 から、月額わずか $45.04/£42.46 をお支払いいただきます。Photoshop、Lightroom、Illustrator を含む Adobe のクリエイティブ アプリのフルスイートに加え、プロジェクト用に 100 GB のクラウド ストレージにアクセスできます。オファーは 2018 年 8 月 26 日に終了します。