
Web サイトを構築したいと考えているが、技術的知識の欠如が妨げになるのではないかと心配している場合は、最高の Web サイト ビルダー (新しいタブで開きます) のリストの先頭によく表示される人気のあるソリューションが Squarespace (新しいタブで開きます)です。新しいタブ)。
何百もの既製テンプレートと豊富なデザイン支援により、コード行を知らなくても、Squarespace を使用して 1 時間以内に Web サイトを簡単に構築できます。Squarespace を使用して独自の Web サイトを構築するための 6 つの簡単な手順を次に示します。
Squarespace で Web サイトを構築する方法: 準備
構築に取り掛かる前に、サイトに何を含めるかを決める価値があります。ポートフォリオを構築しているか、ブログを書いているか、あるいは e コマース ストアを立ち上げたいと考えていますか? サイトを作成する前にサイトの目的を把握しておくと、ニーズに最適なテンプレートのデザインと料金プランを決定するのに役立ちます。同様の Web サイトを閲覧して、他の企業がインスピレーションを得るために自社の商品をどのように宣伝しているかを確認してください。
作成する内容がわかったら、Squarespace アカウントを作成する必要があります。Squarespaceホームページ(新しいタブで開きます)にアクセスし、[始める] をクリックして開始します。Squarespace の無料プランは 2 週間試用できますが、現在利用可能な長期無料プランはないことに注意してください。ただし、アカウントの作成には支払いの詳細は必要ないため、事前にプラットフォームを自由に探索できます。
ステップ 1: テンプレートとサイト名を選択する
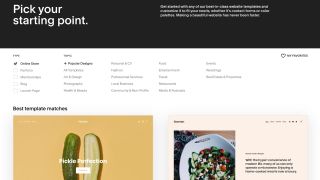
Squarespace は、その驚くべきテンプレートの品揃えで、ライバルのウェブサイトビルダーを圧倒します。すべてプロのデザイナーによって作成され、完全にカスタマイズ可能でモバイル対応で、ポートフォリオやブログからオンライン ストアやレストランに至るまで、それぞれが特定の業界や機能に合わせて調整されています。
時間をかけて、提供されているものを参照してプレビューしてください。選択したテンプレートがキャンバスとして機能するため、好みのものをプレビューして、要件に一致するものを見つける価値があります。
テンプレートを選択した後、サイトの名前を入力する必要があります。ただし、これは編集時に後で変更できるため、まだ決めていなくても心配する必要はありません。
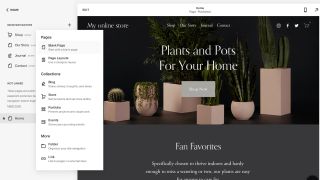
ステップ 2: カスタマイズを開始する

サイトに名前を付けたら、カスタマイズを開始します。ビルド ページに移動すると、右側に便利なアシスタントがポップアップ表示されます。Squarespace は比較的理解しやすいですが、デザイン インターフェイスには慣れるまでに時間がかかる場合があるため、ここで提供されているチュートリアル ビデオを見る価値があります。
The assistant also provides a useful design checklist to work through, prompting you to add your site logo, change colors and fonts, and add or delete pages. To begin editing the blocks on the page, simply click on one—this will present a box where you can customize elements like the text, background image, section height and width, and color palette.
For further customization, head to the left-hand column and select the "Design" option. Here, you can adjust your overall site style to ensure consistency with colors and fonts, edit your browser icon, or even add additional CSS code. Select "Pages" from the left-hand column to add or remove any pages, or to select an existing one to customize.
If you’d like ecommerce integrated into your site, the left-hand column is also where to go—select "Commerce" to begin, and follow the steps provided to get started. There’s plenty of on-screen help when building, but you can find additional tutorials on Squarespace’s knowledge base (opens in new tab) if you’re unsure of anything.
Step 3: Add some content
The type of website you’re creating will determine the content you add, but it’s a good idea to populate your platform with plenty for visitors to engage with before launching.
For example, if you’d like to incorporate a blog—the benefits of which can include increased traffic to your site—you can add a specific page for this before publishing. Head to "Pages" in the left-hand toolbar, and click the plus symbol at the top of the list. You can then select a blog page and begin adding your content straight away.
Alternatively, you could also add a portfolio page, event listing, or store straight from the list.
Step 4: Select your custom domain name
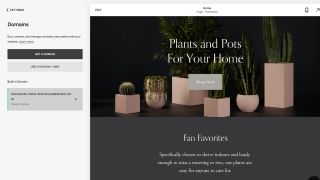
A custom domain name is recommended to help your website attract visitors or potential business. While you can use the automatically generated URL that Squarespace provides, it will have branding at the end of your website’s address (.squarespace.com), which could affect your ranking on search engines and make your site harder to find.
To avoid this, you can purchase a custom domain. When on the build page, head back to the left-hand toolbar and click "Settings" and then "Domains"—here, you can either connect a domain you already own, or follow the link through to purchase one through Squarespace. Prices vary, but usually fall around the $20 mark.
Keep in mind that you can get a domain name free for a year if you upgrade to an annual paid plan—we’ll explain this further in step six.
Step 5: Optimize your site
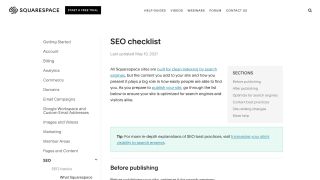
Next up is optimizing your website for search engines. Ranking well on search engines is fundamental for attracting clients to your website, and Squarespace’s built-in SEO (search engine optimization) tools make it simple to get started.
左側のツールバーで、「マーケティング」をクリックし、次に「SEO」をクリックします。ここには、サイトの最適化を始めるために従うべき便利な SEO チェックリストがあり、サイトの説明、個々のページへの SEO の説明、ソーシャル メディア アカウントへのリンクなどを追加するよう求められます。
Squarespace では当然のことながら、すべてが明確にラベル付けされており、専門用語は最小限に抑えられており、行き詰まった場合には画面上のヒントが役立ちます。
これに加えて、Squarespace は生成されたサイトマップを自動的に提供し、メタディスクリプションと画像の alt タグのカスタマイズを可能にし、Google キーワード分析を直接検索して、ユーザーがあなたのニッチ分野で何を検索しているかを見つけることができます。
ステップ 6: プランをアップグレードしてサイトを公開する
無料プランのアップグレードが必要になるまで 2 週間ありますが、サイトを公開したい場合は事前にアップグレードする必要があります。
Web サイトのプランをアップグレードするには、アシスタント ボックスの下部にある [購読] をクリックします。次に、 4 つのオプション(新しいタブで開きます)が表示されます。その中で最も安いのは Personal プランで、年間サブスクリプションの前払いの場合、月額 12 ドルかかります。年間プランには、安価なだけでなく、1 年間の無料ドメイン名も含まれているため、サイト アドレスをアップグレードする予定がある場合は、検討する価値があります。
その他のプランには、Business ( $18 )、Commerce Basic ( $26 )、および Commerce Advanced ( $40 ) があります。e コマースをサイトに統合したい場合は、最後の 2 つを検討してください。
割引については、 Squarespace プロモーション コードページをご覧ください。
プランを選択し、支払いの詳細を入力したら、サイトを公開して立ち上げることができます。
Squarespace で Web サイトを構築する方法: 概要
おめでとうございます。あなたのウェブサイトが公開されました。ただし、停滞させるべきだという意味ではありません。新しいコンテンツを追加し続け、ウェブサイトを定期的に更新し(新しいタブで開きます)、新規訪問者と再訪問者の両方を促進すること が重要です。
また、訪問者があなたやあなたのビジネスに関する最新情報にアクセスできるように、Web サイト上でニュース、コンテンツ、製品を共有し続けることも必要です。頻繁に情報を広めることでトラフィックをさらに増やします。ソーシャル メディアでサイトとそのコンテンツを相互宣伝したり、電子メール キャンペーンを使用してサイトのエンゲージメントを高めたりできます。
それ以外の場合は、新しいウェブサイトをお楽しみください。
ウェブサイトビルダーについてさらに読む
Squarespace が自分に適しているかどうかまだわからない場合は、「WordPress vs Wix vs Squarespace (新しいタブで開きます)」、「Wix vs Squarespace vs Weebly (新しいタブで開きます)」という記事で他のビルダーと比較しています。Squarespace と Shopify (新しいタブで開きます)、および 2 つのセクターのリーダーと一致する詳細な直接比較: Wix と Squarespace (新しいタブで開きます)。
サイト作成の柔軟性を高めるには、WordPress (新しいタブで開きます)に最適なWeb サイト ビルダーを介して WordPress (新しいタブで開きます)を参照してください。どのサイトでも、最高の Web ホスティング(新しいタブで開きます)サービスによって提供される、最高の WordPress ホスティング(新しいタブで開きます)が必要です。