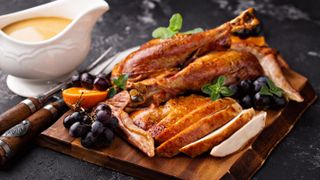
七面鳥のスパッチコックの方法を知ることは、家禽の準備における最新の方法です。この質問はおそらく、七面鳥の味付け方法を尋ねるのと同じくらい人気があります。こうすることで、鳥はより迅速かつ均一に調理され、おいしい結果が得られます。いつもより皮はパリパリ、肉はしっとりと仕上がりますので、手間をかける価値は十分にあります。
If you’re new to spatchcocking a turkey, (or butterflied turkey as it’s also known), worry not — here we will take you through exactly what to do step-by-step to get your bird ready for the table. Better yet, this same technique can be used with chickens and other birds. So sharpen your knives, and get ready for the best turkey you’ve ever tasted. (And when the turkey's done, be sure to check out our guide on how to set a dinner table that will impress your guests.)
- Check out 10 kitchen gadgets guaranteed to make your holidays less stressful
- Here's how to wrap a gift the right way and impress this season
How to spatchcock a turkey
Poultry shears or paring knife
Paper towels
Note that for the purposes of this how-to, we used a chicken rather than a turkey, but the principles are the same.
1. First, pat your turkey dry in the sink using paper towels. Pick it up and hold it vertically to let any residual fluid drain out as well.

2. Next, place it breast-side down on a cutting board.
3. It’s going to rock because of its shape, so you need to hold it firmly in place for the next step.
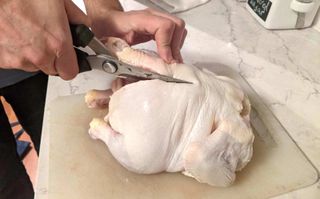
4. Using a pair of poultry shears, cut along one side of the backbone, working your way from the opening near the thighs to the neck. You’re essentially cutting the turkey in half, so don’t be shy. If you find it difficult to cut through, stick to the tip of the shears and make small cuts.
If you don’t own a pair of poultry shears, you can also use a knife, but it's a lot easier with the shears. We recommend the OXO Good Grips Spring-Loaded Poultry Shears ($23.75, Amazon (opens in new tab)).
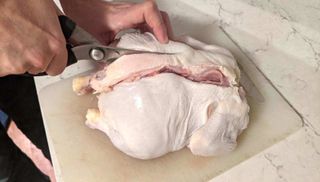
5. Using your hands, pry open up the turkey slightly where you’ve just cut.
6.次に、背骨の反対側に沿って切ります。時間をかけて、指が邪魔にならないように注意し、しっかりと握るようにしてください。
7.これが完了したら、中骨を完全に取り外し、内臓とストック用に保管します。
8.この段階で、ウィッシュボーンや大きな脂肪片など、その他の邪魔なものをすべて取り除くこともできます。取り外す前に、果物ナイフを使って周囲をトリミングすることができます。
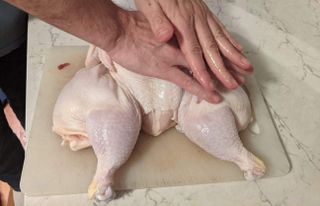
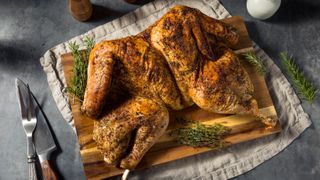
9. 七面鳥をひっくり返し、胸骨の上に平らに押し付けて、脚を外側に広げるか、お好みで蝶のように広げます。気持ちの良いものではありませんが、十分に強く押すと、骨が 1 ~ 2 個割れる音が聞こえます。その後、簡単に平らになります。
10. 七面鳥に味付けし、味付けします。鶏肉の場合は、塩、コショウ、パプリカ、イタリアのスパイスを組み合わせて使用するのが好きですが、他のオプションについては、七面鳥の味付け方法に関するガイドを必ずチェックしてください。
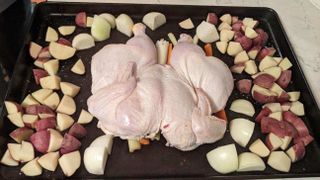
11. 七面鳥をワイヤーラックに置き、天板の上に置きます。ワイヤーラックがない場合は、にんじんやセロリの茎を使っても風味が増します。側面に余裕がある場合は、玉ねぎとジャガイモを切って周りに広げることもできます。
12.仕上げの仕上げとして 手羽先を胸の下に押し込みます。このように調理すると、よりきれいに見えます。
七面鳥をスパッチコッキングするメリットは何ですか?
- より均一な調理 —七面鳥を広げることで表面積が広くなり、より均一に調理されます。こうすることで肉全体がしっとりと仕上がります。
- 調理が早くなる —鳥がよく広げられるので、調理も早くなります。これにより、従来の方法と比較して調理時間を何時間も節約できます。
- よりサクサク –より多くの皮が下に隠れずに露出しているため、よりサクサクした摘みが得られます。
- おいしいグレービーソース —グレービーソースの風味を良くするために中骨を使用することもできます。これがどれほど大きな違いを生むかに驚かれるでしょう。ぜひ活用してください。
- オーブン内のスペースを増やす —七面鳥を平らにすることで、オーブン内の棚を追加するための垂直方向のスペースも広がります。
鳥が適切に調理されていることを確認するには、焼き上がりを確認するための最高の肉用温度計が必要です。調理に時間がかかりすぎる場合は、最適なガスレンジまたは電気レンジをチェックして交換する時期かもしれません。