スマート ホーム テクノロジーの世界に慣れていない場合でも、セットアップ段階に自信がない場合でも、新しいガジェットを試すのは最初は少し圧倒されるかもしれません。それに加えて、箱の中の説明書が曖昧なので、デバイスのインストールを何週間も先延ばしにしてしまうことになるかもしれません。Ring ドアベルの取り付け方法に関するガイドが、困難を乗り越えるのに役立つことを願っています。
The best video doorbells (opens in new tab) may look similar but vary from brand to brand. Even within the Ring range, the specifics of installing each model can be slightly different depending on whether it is battery-powered or wireless or the surface on which you want to mount it. While we've tried to cover as much as possible in this guide, you can also take a look at our article on how video doorbells work (opens in new tab) for more information.
Keep reading for a step-by-step guide on how to get your new smart doorbell up and running, whether you're a renter looking to do as little damage as possible or a homeowner who wants a more permanent solution.
1. Get prepared
Unpack your doorbell and get familiar with its contents, which will likely include the main device, a charging cable, screws and other fittings, and a small screwdriver. The specifics will depend on which model you have, but all of them will be similar.
We recommend laying everything out before you start and choosing a vague place outside for your doorbell to go, so you're not scrambling later.

2. Power your doorbell
If your Ring doorbell is a battery-powered model, you thankfully won't need to fiddle around with any wiring at this stage. Instead, you will have to wait around a little while so that the internal battery can charge. For the Ring Video Doorbell (2nd Gen), you can plug the charger into the port at the back, and for the Ring Doorbells 3 and 4, press the release for the battery pack and charge this.
A small light should be on top of the device that turns green once the battery has been fully charged.
How do you know if your doorbell is battery-powered?
All Ring doorbells have the option to be hardwired, but if you prefer a battery-powered model, you have the following options:
Ring Video Doorbell (2nd Gen) (opens in new tab)
Ring Video Doorbell 3 (opens in new tab)
Ring Video Doorbell 4 (opens in new tab)
These doorbells can be used wirelessly, with a built-in rechargeable battery. The 2nd Gen model will need to be removed entirely from the door for charging, while the 3rd and 4th Gen doorbells have a removable pack that can be released and reinserted when required.
If your Ring is hardwired
The Ring Video Doorbell Pro (opens in new tab), Ring Video Doorbell Pro 2 (opens in new tab) and Ring Video Doorbell Wired (opens in new tab) must be hardwired.
If replacing an existing wired bell, you should turn off your doorbell's power for safety before going further. Then you can take your old doorbell off and carefully disconnect the wires. Note: you may need an additional transformer to replace an old doorbell, so check your chosen model's fine print.
What if you don't have existing doorbell wiring?
Ring allows you to 'hardwire' your doorbell from scratch with its plug-in adapter (opens in new tab). This works with an ordinary indoor socket with a wire going out to the doorbell. Otherwise, you can call out for professional installation.
3. Download the Ring app
The Ring app is where all the action happens, and you should ensure you're set up before mounting your device. You will find the app in your phone's store.
Once downloaded, you will need to create an account. This account can host any Ring products, so you won't need to re-register if you add a security camera or chime from the brand later.
チャイムに関して言えば、Ring はチャイムを別売りしているため、誰かがドアに来たことを携帯電話に依存したくない場合は、Ring Chime Pro (新しいタブで開きます) を検討してください。これはアカウントに簡単に追加して、ドアホンにリンクできます。
アカウントの準備ができたら、「デバイスのセットアップ」オプションを選択し、続いて「ドアベル」を選択します。次に、アプリは、デバイスの前面にある QR コードをスキャンするように指示します (見つけるのが難しい場合は、フェイスプレートの下にある場合もあります)。
スマートフォンのカメラでコードをスキャンすると、次の段階に進むことができます。位置追跡を有効にすると (一部の機能に必要)、アカウントがユーザーの現在地を認識し、デバイスの名前をカスタマイズできるようにします。
4. ドアホンを自宅の WiFi に接続します
ドアホンの裏側にオレンジ色のボタンがあります。これを押すと、前面のライトが回転し始めます。完了したら、アプリで「続行」をタップします。次に、ホーム WiFi ネットワークに参加するかどうかを尋ねられます。Android ユーザーの場合、このステップは自動的に行われます。パスワードを入力してください。
準備はできているはずです!
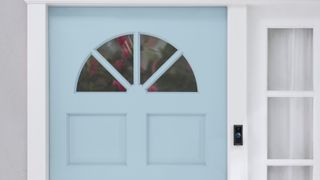
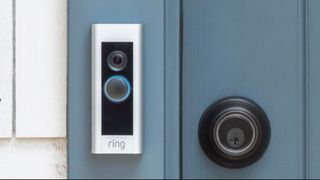
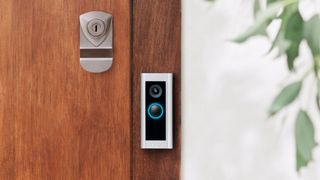
5. ドアホンを取り付ける
新しいドアホンは地面から約 1.2 メートルの位置に設置することをお勧めしますが、私道の長さや玄関ドアまでの段差の有無などに基づいてご自身で判断してください。
取り付けブラケットを選択した位置に置き、ネジを取り付ける位置に印を付けます。完璧に位置を揃えるためのレベルツールも含まれています。レンガ、コンクリート、または漆喰に取り付ける場合は、箱に含まれているプラスチック製のアンカーとドリルビットを使用できますが、木製の表面にはアンカーは必要ありません。
次に、ネジを使用して、最初にマークしたのと同じ位置でマウントを壁に固定します。マウントにはタブがあり、小さいネジを使用してぐらつかないことを確認する前に、Ring ドアベルを所定の位置に差し込むことができます。
これらの安全ネジは、モデルによって外観が若干異なる場合がありますが、基本的にはフェイスプレートを所定の位置に固定するために機能します。
Ring ドアホンが有線接続されている場合
マウントまたはデバイスを取り付ける前に、既存のドアホン ワイヤーがブラケットの穴に通されていることを確認してください。マウントを壁に固定した後、これらのワイヤーをリング ドアベルの背面にあるネジに接続します。その後、上記の手順に従うことができます。
有線モデルの選択に悩んでいる場合は、Ring Video Doorbell Pro と Ring Video Doorbell Pro 2のガイド(新しいタブで開きます)をお読みください。
穴を開けたくない(または開けられない)ですか?
あなたが賃貸家で、家の外側に穴を開けたくない場合は、完全にリバーシブルで Ring ドアホンを取り付ける別の方法があります。重要なのは、すぐに摩耗してドアホンが壊れることのない高品質の取り付けテープを入手することです。私たちはこの方法を使用して成功しましたが、同じ結果が得られるという保証はありません。したがって、安全のために、従来の方法で取り付けることをお勧めします。